Tuesday, November 15, 2016

Fold formed copper earrings with a blue patina

The fall time change is probably something that most people look forward to.  Not me.  I already wake up really early whether I want to or not and the additional hour sometimes means I wander the house doing laundry or other semi-quiet things while I wait for the sun to come up.  I know that eventually I'll adjust to the change and won't wake up at 4am so I like to be productive if I can.

This week I've gotten some time in at the workbench during that extra early morning time and it's been a nice way to start the week days.  I worked on a group of fold formed earrings and I really love the outcome.


I started with a fairly substantial piece of copper that I annealed and folded and annealed and hammered and annealed and hammered.  


I'm drawn to the red of a heat patina on copper but decided to change things up a little bit after I got the earrings cut and sanded.  I put the copper pieces in a container with ammonia and salt to develop a blue patina instead.  The result is pretty rustic and a great match to the organic look of fold forming. 


Thursday, October 27, 2016

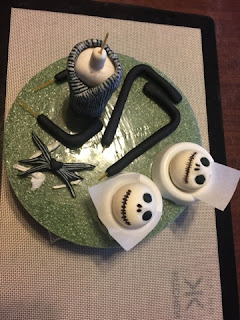
Nightmare Before Christmas cake

This week we had a work gathering with Halloween themed foods so I decided it was time to break out some of my old cake decorating materials.


I haven't made a big cake in a long time, so the amount of time it took to put this together was kind of a surprise...I'm sure I was faster at most of these techniques when I was making cakes more frequently but it swallowed up my evenings and early mornings for several days. 

I made the Jack Skellington and Zero figures out of fondant and set them aside to dry almost a week before I needed the cake in order to let everything dry and solidify.


Jack was a challenge; his body is so long and thin and the head is so heavy that I really didn't know if he would make it to the destination in one piece. It was a horrible ten minutes of driving, parking and carrying the cake into the building (also some swearing and muttering) but I made it with no major incidents! There is no better feeling when it comes to making these things than dropping the cake off intact and then simply walking away.


Saturday, September 17, 2016

Horror movie charm necklace

Ok, so I know I should knock it off.  But I couldn't stop thinking about those horror movie charms I made last weekend, and when I wake up uber early thinking about metal projects I know if I don't just get it out of my system the thoughts won't leave my mind.

This morning I went straight to the workbench and made three more charms: a Freddy K inspired glove, a meat hook and an axe.  I put all five on an adjustable chain for a horror movie themed necklace.  This is probably it - I won't be making more because they aren't exactly items I can probably sell at my holiday show in November and I need to focus my efforts!


My favorite charm is the glove...I'm not sure I could duplicate that one if I tried.


I've listed the necklace for sale in my Etsy shop here...maybe there is a horror movie buff out there who would love this one of a kind of jewelry.

Monday, September 12, 2016

Thinking about Halloween

Last weekend I had some time to just play around at the workbench.  Early in the day, the weather feels like fall and I couldn't pass up the opportunity to make a few Halloween inspired things.  These are all still in need of a final polish/clean up but I like how they've started out!


I started with a sugar(ish) skull and sacred heart pendants.


'Tis the season for scary movies so I googled "horror movie weapons" from my phone.  The first image result was a cartoon drawing of a chainsaw, a butcher knife, a machete, and various other weapons.  I started these two horror movie charms....I have no idea what I'll do with them but I kind of love them. 


I finally reprogrammed my kiln controller and made a couple of test beads.  I haven't touched glass in a very long time and I know that the learning curve is always steep to get started again. These little guys are far from perfect but actually turned out better than I thought. 


Saturday, August 6, 2016

Bottle tags for decanters

Ben loves to go to garage sales.  I don't, but I take him some Saturday mornings with the sole purpose of being his driver and scout, helping him get to and comb through piles of random things.

I can't say it doesn't occasionally pay off...I have gotten boxes of files and hammers for next to nothing a couple of times.  Last weekend I found several glass decanters covered in dust and bought three of them.  While they soaked in the sink I went to the workbench and made bottle tags for each of them in copper.    


I can't seem to stay away from a heat patina when it comes to copper.


I honestly don't really drink much of anything that needs a tag.  Wine goes bad, so that wouldn't work.  I picked three types for the tags, then went out and bought alcohol I'll probably never drink to match the labels.


There is something I adore about the elegant, symmetrical glass patterns with rustic copper tags hanging on them.  It's good that I like them, because I think they may sit on the side table in the dining room full to these exact levels forever.


Sunday, July 17, 2016

Sandcasting

I've been trying to successfully sandcast from my sterling silver scrap for months with less than great results.  It's something that must come with practice because my pieces became better over time but until this weekend I've just taken the piece and tossed it back into the crucible to melt down for the next try.  Finally, I have a finished cast piece I'm happy with.


We live close to a wooded area and see our share of field mice. I found a mouse skeleton on the back deck a couple of weeks ago and soaked the bones in bleach for several days to see what I had to work with. I decided to try casting the femur.  (I know. It's kind of gross, but I had no part in the little guy's death...and even though it sort of creeps me out I was also weirdly interested in trying to cast it.)


After the pour.  There are generally a few flames and some smoke but it doesn't have to sit long before the mold can be opened to see the results.


I sawed off the excess and did some sanding, tumbled and then added a light liver of sulfur patina. 


Tuesday, May 10, 2016

Sawing practice

I'm trying to get better at sawing in general.  It's almost meditative once I get started and it can really add some flair to metal work - I've seen some amazing, intricate saw work added to jewelry but my focus at this point is just to be able to saw out simple silhouettes with some accuracy.


Over the past couple of weeks I've been using this Jayhawk shape for my practice; it's got plenty of little ins and outs to provide a little bit of difficulty and I just happen to have a roll of duct tape with an endless supply of the image to use.


I kept thinking that if the silhouette was decent I could use it for a keychain. The base was a heavy gauge copper and silver would provide a good contrast but I didn't want to start out with sterling...too expensive for mistakes.  I ended up with several Jayhawks - some better than others - in aluminum and stainless steel.  Not perfect, but definitely good enough for me to use for my office keys.


When it was time to add the shape to the copper base, I grabbed one of the birds thinking it was stainless steel but apparently it was aluminum, because I fried that little thing in no time at all. The melting point for stainless is 2500 degrees but aluminum is more like 1200.  I still kind of like how it looks, but I couldn't add it to that copper backplate because it's so heavy it needs a lot of heat to warm up for soldering. The aluminum would've melted into a puddle before I could get it attached. 


After the meltdown, I tried again with some scrap sterling (when I say scrap, it's not an understatement - it was pretty beat up). 

I left a very rustic finish on the whole piece to match the scrap sterling.  


Friday, May 6, 2016

Druzy quartz and tiger eye rings

I'm trying to pace myself, making jewelry fairly consistently throughout the year so that I have a decent stock to bring to the holiday show that I participate in.  I was on sabbatical last year because I just wasn't feeling like making much of anything and I didn't want to push it.  It seemed to do the trick because I've started to want to make things again.


In the last couple of weeks, I've made a bunch of rings and earrings with druzy quartz and tiger eye. The druzy quartz have fine sugar-like crystals on the top of them formed when dissolved silica carried by ground water is deposited in porous areas on the stones.  The quartz I got has been treated with an iridescent coating that really makes them sparkle.  


I made a few tiger eye rings - two were gifts and one will go up for sale - with some simple stamping around the bezel.


Hopefully I can keep this up...it feels good!

Saturday, April 2, 2016

Copper patina experimentation

So far I've not tried too much variation on the patina I use for copper, but I read (re-read, really - I've had the book for a long time) about adding a blue patina in the book The Jeweler's Guide to Decorative Finishes with ammonia and decided to give it a try.


I prepped some copper components by sanding them lightly, then put them in a big plastic container and sprinkled salt on them.


Ammonia fumes are what do the trick, so I put a little dish of ammonia in the bigger container and then put a lid on the whole thing.

It took three tries to get a shade I was really happy with - the first couple of times I left the copper in the container with the ammonia for a couple of days and the blue became so dark it was closer to black so I tumbled the pieces and started over.

Here are the pieces just removed from the ammonia chamber:


...and the finished earrings.  The finish is rough and very organic but I like it!  (Final pictures were taken outside.)

Saturday, January 9, 2016

Adjusting the baseball designs

I've been trying to rethink the design on how to incorporate baseballs into jewelry and key chains. Putting them into regular bezel settings is ok but the edges of the leather becomes somewhat frayed. This is especially true of the key chain I made for myself...it just gets knocked around a lot.

I finally settled on building something like a lid on the bezel - I made this set over the holiday break and I'm really happy with it.  More to come (after the weather warms up)!