Saturday, May 25, 2013

A jeweler's dilemma

This post is dedicated to my husband.  This is ridiculous for two reasons - first, it's a blog post. Second, I'm fairly certain he has never read a single post on my blog and if asked, can't even tell anyone the URL.  But had he not supported this effort and helped me with all of the heavy moving and lifting, I'm not sure this project would have ever gotten off the ground.

Ok, so this probably isn't every jeweler's dilemma.  But certainly mine (I feel weird referring to myself as a jeweler, but apparently I am; Wikipedia says so).  I've been making jewelry for over a decade and have been aware the entire time that I needed to do something about the ventilation in my workspace.  I did a ton of research and had several false starts toward doing something to take care of the issue, but every time I thought I was really going to do something about it this time, dammit, I would hit a wall.  

There is an odd thing that happens around other jewelers when ventilation comes up.  People in the forums and social networks who are extremely supportive and fun and happy morph into scary, lecturing safety experts if there is so much as a hint that mayyyyyybe there isn't adequate ventilation. Yes, it's important.  But people get strangely angry and self righteous about what other bench jewelers should be doing and think nothing of making sure you know that if you don't have a full hood and fan system you are a horrible person. Don't get me wrong, there are certainly people who are very willing to help - I found most of my information about what could make things better (having an adequate intake (uptake?) air source was definitely something I didn't have in my set up) in one of the Lampwork, etc forums - but the negative side can be overwhelming.  

So I ran fans and wore a respirator mask with my safety glasses every time I worked at the bench to try to keep my exposure limited and wrestled with whether or not I could really afford to do something more formal.  The respirator is bulky and in the summer gets disgustingly sweaty, but I can sing at the top of my lungs without anyone really hearing how terrible my voice is.  (Watch out - I had just finished a cardio workout and there is no makeup whatsoever involved in this picture.) 


I called a local HVAC company that quoted me a price of $3,000.  I seriously considered cutting the holes myself and piecing together my own hood and ducting system but there are all sorts of things that have to be right - the fan CFM and the angles in the ducting (whatever you do, don't use corrugated ducting because it reduces air flow)...it was a lot to try to figure out and then get shipped in and install, let alone pay for. Especially since this isn't my day job - it's hard to justify spending so much on what is really more of a hobby than what actually helps to support my family.

I finally decided that I was over complicating the whole thing and that I needed to start somewhere and make some sort of improvement to my workspace. Shifting the focus to progress rather than perfection lifted the burden and in the end, some adjustments would be better than none.

Those adjustments started with an industrial fan that would pull the air through the workspace. No ducting or hood for now; just start with the fan. I ordered this fan and this hood.  It sits flush against the outside wall with shutters that open when the fan is on and close when off. The hood may not have really been necessary, but it seemed like a good idea to help keep the weather out.


We had a local contractor come out and cut the opening and do the installation.  After literally years of contemplation and worries about how much it would cost, the whole thing was installed and ready to go for less than $300.

This isn't complete - just an important first step. I'm hoping that from here, adding on won't seem like such a daunting task.

The catch was that we had to move my whole set up to the other garage so we could avoid things like the fuse box and major electrical issues.  So this weekend we cleaned it out and moved it all. When the fan is on the highest speed, it pulls my torch flame a bit so I will probably stick to the medium speed most of the time for soldering.

It's not perfect. It won't stand up to critiques by the people who are so negative in the forums about what must be done. But the strength of the fan and the fact that my intake air source is huge with the garage door left partly open is a giant improvement from the previous set up.  I stand behind the workstation and can see the flame pulling toward the fan and feel the air pulling in from behind me and up.  It feels similar to working outside with a breeze which is also nice for a hot summer day. I'm not so sure how that will feel when it's 12 degrees outside, but I'll worry about that in a few months.  


Update: Spring 2014

I'm still chipping away at the setup to make better use of the exhaust. I moved everything so that my torch work is about two feet below the fan. I don't like it as well as I did when the workbench was on the other wall but I know it's better for ventilation and I've gotten used to it. I need to add the hood to better draw the fumes; hopefully before the end of the summer.


Update: Summer 2015

I finally added the hood above my workbench. Ideally I think I need to add some flared metal to the bottom of the hood to help funnel the air, but for now I'm happy with the progress.  The bottom of the hood is about two feet from the surface area I use for soldering (I have a tripod setup, not shown here because I removed it so I could step on the table to install the hood) and I can feel a marked difference in the air flow. Occasionally I have to turn the fan down because I'm trying to solder a larger piece and can't keep enough heat on it from the torch.  

Whether I add a bit more or not, I'm really glad that I treated this as a long term project rather than trying to get it installed in one step.  

Wednesday, May 15, 2013

The Artists Synchroblog - May

The Artists Synchroblog is a group of bloggers who post every other month on the same topic, sharing our experience or perspective. On alternate months we undertake a Pinterest Project where we each take inspiration from a Pinterest picture, create something (art, a meal, a DIY project, etc) and then post about it.  You can read more about the Artists Synchroblog here.

The May topic for the Artists Synchroblog is "Words Have Meaning".  This could go sappy very quickly, but the first thing that came to mind for me when I thought about my projects is the saying 'measure twice, cut once'.  I hate measuring.  I'm generally a fly by the seat of my pants kind of girl when it comes to making jewelry, but I'm trying to get better about planning out my cuts for certain projects...it just makes things easier in the long run.

This could not be more true than when it comes to making ring shanks. It may not be necessary when I'm just working on a new design and the actual size of the ring doesn't matter, but if it's a custom order the size has to be accurate. Rather than wrapping the metal around the ring mandrel and getting it somewhat close to the size I need, I've started using a formula I found in the Ganoksin archives.

Here it is:  Take the inner diameter of the ring you want, add the thickness or gauge of the metal you are using, then multiply by Pi.  So (ID + T) * Pi

I use this website to convert measurements between inches and millimeters, this website to get the inner diameter measurement of the ring, and this website to convert the metal gauge measurement to inches and millimeters. There are also free apps I've downloaded to my iPhone called GlobeConvert Free and Pocket Ruler Free to convert the measurements and measure the stock since I am usually streaming music or listening to podcasts while I'm at the workbench and can just pull those up to keep working rather than going to the computer.

But even better...this artist has a chart on her website with all of the calculations done for me. Since I'm what some people may consider to be *slightly* skeptical, I often check it against the manual calculation just to be sure, but it seems to work pretty well.  (There are lots of places online to find inner diameter ring measurements, but they don't all agree so it's best to look at it a couple of ways to be sure you get about the same length more than once.)  I've also started doing something I never, ever thought I would: I keep notes about the lengths for sizes that work well. 

Here's a ring I used this calculation with recently; a replica of the engagement ring I made a couple of weeks ago with a faceted 8mm green topaz in a tube setting on a substantial, wide shank. I needed a size 7 ring and the silver stock I was using was a low domed wire - a heavy 13 gauge.


My measurements for the ring and the silver stock:
Inner diameter of a US size 7 ring:    0.683 inches (converts to 17.3482 mm)
Gauge of the silver stock:  13 gauge (converts to 1.83 mm and 0.072 inches)

(ID + T) * 3.14 = length of metal stock needed
(0.683 + 0.072) * 3.14 = 2.3707 inches
2.3707 inches =  60.21 mm

I added a teeny bit to allow for trimming during sanding so this would leave me with a 61 millimeter piece of sterling.

The ring chart I referenced above doesn't have a measurement for 13 gauge metal stock so I averaged the measurements between 12 and 14 gauges and get a total of 59.8 millimeters.  Pretty close to my calculation, so I was ready to cut.

I measured out the stock, marked it and cut it. Another way to try to keep frustration low with rings is to use a saw and a tube cutting jig to cut the stock to try to make sure the two ends can fit together for a nice join where the solder will flow without too much fiddling. (Brace yourself: images from the workbench are taken in a garage and the lighting is pretty terrible.)


I realize this seems like a cumbersome process, but in reality it can save a ton of time, materials, and general swearing and frustration.  Trust me, I've definitely learned this one the hard way.


Please visit the other bloggers involved in the Artists Synchroblog this month:
http://amyestellemetalworks.blogspot.com
http://www.islandgirlsinsights.blogspot.ca/
http://www.wrapturewirejewellery.on.ca/blog
www.elenorbuffington.blogspot.com
http://doxallodesigns.blogspot.com
http://lesliervillarreal.blogspot.com
http://www.journeyinjewelry.com/blog/My-Journey-in-Jewelry
http://simpledesignjewelry.blogspot.com
http://designsbylynnea.blogspot.com/
http://marikach.blogspot.com/
www.createrecklessly.com
http://design.kcjewelbox.com
www.allwiredupjewelrydesigns.blogspot.com
http://shaktipajdesigns.com/blog/
http://silversmithblog.com/
http://stonezjewelry.com/blog/
www.beadsbythebay.blogspot.com

Thursday, May 9, 2013

Engagement ring

When people ask me why I don't just make jewelry for my full time job, I roll my eyes internally.  I know it's a compliment and it's not that I don't appreciate the sentiment.  But I like making jewelry at this pace and without the stress of a bottom line looming over me.  The idea of trying to make enough money from jewelry production to live off of would completely ruin it for me.  I end up selling enough to buy more materials and tools and equipment. But if I don't sell an item for months or years, that's ok.  It just means I have to wait to buy that next tool.

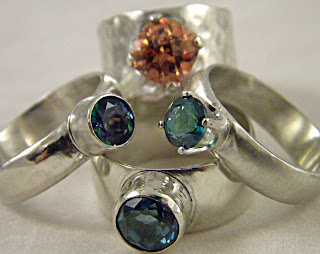
The thing I love the very most about making jewelry is being able to create things for people I care about.  So when my brother asked me to make his girlfriend's engagement ring, I took it very seriously.  I was determined to give him several options and sent him a million texts about ideas. I ended up with four. (Maybe really just three and a half.  One ended up being more cocktail ring than engagement ring.)


We talked about stones and I ordered green and rainbow topaz.  Green topaz was the front runner for the ring, but there is something about rainbow topaz that talks to me.  Like whispers in my ear that I should keep it. The stones arrived and I swear I got them out and just looked at them then put them away for two weeks.  Sometimes being emotionally connected makes me freeze up because I'm afraid I'll screw it up.  But I had a firm deadline to meet and that helped.


See what I mean about the rainbow in that last image????  I almost can't take it.

I made the ring shanks and built the settings (and rebuilt them and rebuilt them and finally removed one, in the case of the claw settings.  I think I hate those).


This was the ring that I made specifically with the bride-to-be in mind; I love it.  It's also the one that my brother chose. 


She said yes! (Obviously...if she hadn't, this post would have probably just been about topaz and "general" rings.)

I'll put the remaining rings up for sale if I can talk myself out of keeping them.  Seriously, I don't need any more rings. I say that but keep adding rings to my jewelry drawer.


Sunday, May 5, 2013

Zebra striped birthday cake

This weekend has been one of celebration.  The whole family went home to surprise Dad with a weekend visit to celebrate his birthday on Sunday, and when we all arrived on Friday it was my niece's birthday.

Even though we were traveling for Dad, I kept thinking about the fact that my niece would be making the trek on her actual birthday - planes, rental cars, carry on issues, all of that - and wanted to be sure we had a cake for her when she arrived.

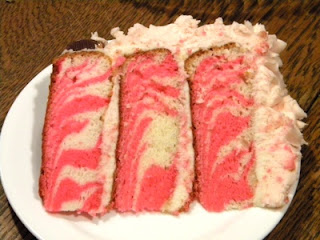
I baked three layers of cake with a zebra stripe pattern in them (I really baked four layers but decided one was over baked and threw it away). I like making the zebra stripes because they are SO easy but people are generally ridiculously impressed with them. All you need to do is have two colors of batter to drop into the middle of the pan over and over until the batter is gone like I did for these cupcakes. Just keep adding right in the center alternating the batter and when you run out, bake as usual.


I used a 1M tip to frost the cake in a ton of rosettes but ran out of frosting just before finishing. I had baked the cakes before traveling but decorated them on site and I had to just make it work with what was available...and what was available were mini chocolate bars. So I added those around the bottom for a border. 


Happy birthday, Grace and Dad!