Saturday, October 30, 2010

Glowing sugar for a special order

I asked Ben what kind of cake he wanted for his birthday, and I swear he had to have been saving this up.  The order: A boy, trick-or-treating in a ghost costume, with glowing red eyes and a candy bag next to him that was as tall as he was.  Oh, and a number six coming out of the bag.

I immediately wanted to point out that glowing red eyes changed the boy to something sinister, but the customer is always right.  Especially for his birthday.  

I made a chocolate bag to put next to the ghost-boy-creature first, then made a batch of poured sugar with this recipe for the glowing eyes.


I found some little battery-operated LED lights in the wedding section at Michaels (at the second Michaels I went to, so if you go looking for these, they may not have them at every store).


When I pulled the sugar off the stove, I added the red coloring and poured it into this silicone mold.  Then I waited.  I was nervous about plunging those plastic covered lights into 300 degree pool, but at some point I knew the sugar would be less forgiving and I wouldn't be able to get them in there.  I poured six molds in the hope of ending up with two that worked. 


As they cooled, all six of them flickered and went out at one point or another.  But eventually, they all came back on.  (Side note:  those lights boast a glow for eight hours. I put the remaining eyes aside to see how long they would last.  One week later, they were still glowing!)

I made the ghost with two six inch cakes and one half of the ball pan, covered in fondant.  I added the sugar eyes (first I covered the back of each eye with a little ball of fondant to keep the plastic materials out of the cake) the chocolate bag, and finally, the number six candle.


Generally, when I make cakes, I bake them the night before I need them and put them in the fridge overnight to help with stability.  I didn't do this with the ghost cake.  I was unwilling to put the cake in there with a red-onion-filled salad.  A thick coat of saran wrap is no match for onions, and I decided to do a flash freeze the next morning instead...but never got around to it.  So after I got it all assembled, the weight of the fondant started to make the ghost-boy a little...fatter.  And fatter.  I'm going to blame it on all of the Halloween candy the kid-ghost would have ingested. 


Ben was happy, so I was happy!


Monday, October 25, 2010

Chocolate bags

Apparently, lots of people know you can make bags out of chocolate.  It was news to me, though, and when I heard about it a couple of weeks ago I knew I had to give it a try.  And Ben's order for his birthday cake gave me the perfect opportunity. 

I have to admit that this is incredibly easy, so that makes it considerably less impressive.  But here's how it's done:

Materials
  • chocolate melts or tempered chocolate
  • unused coffee bags (how you get these is up to you.  I spent a lot of time spinning elaborate tales about why I needed extra bags with no coffee beans in them, but you can probably just ask if you can buy them at the store)
  • pastry brush
The coffee bags are important because they have a slick lining in them that helps with removal once the chocolate cools.  I decided to do two bags in case one failed.  One was really flexible and the other was pretty rigid, so I figured one of them would work out.

Melt the chocolate.  I needed a black chocolate bag, so I totally cheated and bought black chocolate melts. (One time, probably seven or eight years ago, one of my best friends told me she refused to split her grocery shopping between three stores to save nickels and dimes here and there.  She said, "my time is worth something".  So that's what I say to myself every time I decide to pay a bit more for something to save myself some time.  I don't really buy into it since I'm a chronic overdoer, but it works in the moment.)


Cut the top portion of the bag off--down to whatever size you want your chocolate bag to be.


Use the pastry brush to paint the melted chocolate into the corners of the coffee bag and let that layer cool.  Then paint the rest of the inside of the bag and let it cool.  Keep adding layers of the chocolate "paint" until you think it's thick enough.  


I probably went overboard on the thickness, but when the bags were done I had no concerns that they would hold up if they survived the unmasking ceremony.

Put the bags in the refrigerator for 15 minutes.  This isn't totally necessary for the cooling, but I have found that if I let chocolate cool at room temperature instead of giving it that blast of cold, it seems to sort of disintegrate when I touch it.  The fridge gives it some sort of stability you don't get when you leave it on the counter.

Remove from the fridge and peel the bag away.  I just went to the bottom of the bag where the seam was and pulled from there...simple.

I didn't need two bags; they both worked out really well.  I decided I liked the look of the one that came from the more flexible coffee bag better for the cake I was making, since I had to stuff it and it sort of sagged to provide a better opening to do that.


I won't lie, I think this is pretty awesome.  Mostly because of the detail you get in the seams and folds.  But also, the whole project took less than half an hour--including fridge time.

Wednesday, October 20, 2010

Texturing hammers

I have coveted a rolling mill for years. I love the textural possibilities it brings to metal, so every time I see the results another artist gets with their rolling mill, I shop around online to compare prices. But I always ultimately decide that I don't want to buy something in the moment that is super cheap (still $250!) and later wish I had waited until I could afford something better.   

I got a catalog in the mail from Kingsley North a few weeks ago.  I generally groan when I get those giant volumes.  They just take up space and since Lowell is a recycling ninja who also believes that everyone is trying to steal our identities, it means that I have to flip through the catalog and make sure that all identifying information is out of there before dumping it in the bin.  Once (one time!), I missed that center form where the company has pre-filled your address information and Lowell simply pulled it out and dangled it in a floppy hand off his hip, wearing a look that said I was totally, hopelessly irresponsible. So I don't want to relive that.  Besides, I prefer to buy jewelry making supplies online...it's just easier.

So when this catalog showed up, I wasn't too thrilled.  Also, I had never heard of the company before, so I was a little bit suspicious.  But I noticed something about new texturing hammers on the front of the catalog and had to at least take a look.  I have seen hammers like this from other companies, but they had changeable hammer faces and my experience with that sort of thing has not been great.  KN had three kinds with different texturing elements on each side of the hammer head--bubbles, lines, squares. They looked promising and really didn't cost much, so I went against my intuition and ordered the hammers.  

And they are glorious. 

Side one:

Side two:


Bottom line, I love them.  I still have clean-up to do on these pieces, but here are my results from the first run:


Saturday, October 9, 2010

Beer-flavored cake

I have to start this post by apologizing to my brother Paul, the recipient of the first beer bottle cake I made.  Had I really thought things through, I would have made him a beer-flavored cake as well.  Sorry, Paul...next time, really.

I made cupcakes and a groom's cake for a wedding reception last weekend.  When I asked what flavor they wanted, the groom said, "beer".  We moved on and the cupcakes were assorted vanilla, chocolate, and red velvet.  But I found several recipes online for Guinness beer cake to use for the groom's cake and decided to go with it.


For the cake, I used a Dark Chocolate cake mix and just replaced the liquid the instructions called for with the Guinness beer.  Before adding it, I reduced it on the stove by simmering it on low heat for about 15 minutes.  Then I mixed and baked the cake as directed on the box. 

When I taste-tested this, I couldn't really taste the beer.  The cake was very rich and moist...very chocolate.  No beer flavor that I could tell.  Not a bad thing, but the beer flavor was the whole point.

But that was just the beginning.   I reduced another two cups of the Guinness and used that to brush the cake like a simple syrup.  Then I made Guinness buttercream frosting.  This was very touch and go, since I couldn't find much for a recipe.  Poor Lowell had to taste test it for me three times (what.  I don't have the slightest interest in tasting frosting that is not perfectly sweet--what if it ruined frosting for me?  Also, the smell of stout at 10 am simmering on the stove was making me slightly queasy) before I decided it was just time to put it on the cake and call it good. Even then, he said he really couldn't taste anything but "frosting". But there is only so much liquid you can add to frosting before it becomes glaze, and that was not what I needed.

Guinness Buttercream Frosting
1/2 cup unsalted butter
4 1/2 cups powdered sugar
Approximately 5-6 Tablespoons Guinness

I doubled the cake and frosting recipes to make the double layer 9 inch cake and used the Guinness frosting for the filling and the crumb coat.  I covered the cake in fondant and sprayed it a gray-silver color to look sort of like a metal bucket.

Earlier in the week, I made a batch of poured sugar ice and a sugar beer bottle using my silicone mold.  The groom's favorite beer is Miller Lite, so I bought a six pack of the beer and soaked one of the bottles in the sink until the label peeled off easily.  I used that to create an edible image, and added that to the sugar bottle.


I might be willing to admit that I'm a little bit proud of how the bottle and the ice turned out. 


Just a little.
Ok, it was hard to actually just put the cake down on the table and walk away.  But I did.  And I also gave the groom the six pack of Miller Lite, label-less bottle and all.

The bride told me that they all loved the cake and it was very moist, but that she could really only taste the Guinness in the frosting.  She complimented the amount, though, and said it was detectable but not overwhelming.  Success!


Tuesday, October 5, 2010

Etsy treasuries--who knew?


I started my Etsy shop in earnest a few months ago.  I decided I will phase out the website and use Etsy because it's so much cheaper and I'm soooooo bad at marketing my stuff.   I really just need a place to have something "out there" and a way for people to find me and contact me for jewelry. 

Shortly after listing a few items, I got a "convo" (this is Etsian for "conversation") from someone saying she had put my necklace in a treasury (that's Etsian for little collections that members put together, often with some sort of theme.  Sometimes people comment on them or shop by going through them...basically, it's a nice way to get some exposure.  When you go to the Etsy home page, the majority of what you see there is someone's treasury).  So I took a peek.  She had put my amethyst and sterling necklace in a treasury with a sort of dark, gothic feel to it.  I have to admit, it felt kind of cool.  (Then I worried briefly that maybe THAT was my 15 minutes of fame???  I guess it's better than making the paper for being arrested on a drug charge.) 

So a couple of days later, I made my own treasury.  It was fun, just surfing around to find items that I thought would fit into my little collection.  Soon after, I made another one.  Before I knew it, I became sort of hooked on making treasuries.  I would come home from work in the evenings and do searches on the laptop for 15 or 20 minutes while dinner was on the stove. I put items in little collections based on a feeling or color or an event. Serenity.  Halloween.  Cake.  (There is some seriously awesome stuff on there.  Seriously.)  This treasury is my current favorite (probably because people commented and told me I was clever...I'm a sucker for that kind of thing).

I like the idea of supporting handmade items, and I like how much weird and interesting stuff Etsy has to offer. There is even a feature to "shop local" that filters out the artists in your area.  And some of the pictures are stunning--so many of the photographs are creative and artistic--it's incredible. I had no idea. 

I don't know that I will ever sell anything from my shop, but I think I will keep popping in to do treasuries here and there--if you haven't checked it out, you may want to the next time you need a gift!

Friday, October 1, 2010

Cakeapalooza

I've sort of fallen off the face of the earth in everything I do online lately.  I haven't gone to the forums to check out what's going on, I've fallen way behind on the blogs I follow, and I obviously haven't been posting anything here lately. 

I've been caking in most of my down time.  I made two big cakes for baby showers last Saturday and worked at the bakery on Sunday.  This weekend, I'm making 100 cupcakes and a groom's cake for a wedding.  And after that, I think I just have a regular sized cake to do every weekend through the end of October, getting easier as I go.  I delivered both cakes last weekend on time and there was only a brief period when I considered putting my fist through the second one, so I say that was a successful cake weekend.

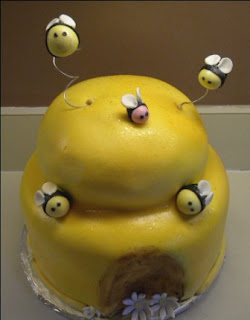
The first one was sort of fun--a double layered white cake with chocolate buttercream filling for the base and a chocolate cake with raspberry buttercream filling for the top.  I covered both tiers with cream cheese frosting and marshmallow fondant.


I think the fondant bees were the best part.


That cake went out late morning.  I was relieved that I didn't have to color any fondant for the second one, but it was GIANT.  Three layers of cake on the bottom and two on the top--same flavor combinations as the first--that thing was heavy. (Incidentally, the three layers on the bottom were the problem when I almost lost it and punched the cake.  I rolled out the fondant FOUR TIMES before I got enough to actually cover it.  Seriously.  My forearm muscles were extremely sore on Monday when I went back to my day job.)


This one was my gift for a friend I work with at the bakery.  I've witnessed an awkward moment more than once when a party is being planned for someone who makes cakes...there is usually some dead air when the issue of the cake comes up. I don't think anyone was going to ask her to make her own cake, but you do wonder--what do you get for the person who makes five tier cakes for other people?  I volunteered and it worked out great; the party planner couldn't have been more organized and gave me clear instructions about what she wanted.  Plus, I didn't have to stack that monster and try to transport it all put together.  I took it in separate pieces to the shower and added a border between the tiers when I got there.

So the biggest cake weekend is over.  It's all downhill from here, right?