Monday, December 27, 2010

Holiday trays: chocolate peppermint cupcakes


Another  treat on our holiday trays for the neighbors was a box of cupcakes—dark chocolate cupcakes with peppermint chocolate ganache filling and peppermint buttercream frosting.  

The chocolate cupcakes were just box mix—I made them  using the soda method, then set them aside to cool for several hours.  I decided to core the cupcakes rather than use a bismark tip to fill them with the ganache.  There are little kits available to core cupcakes, but I just used the fat end of a large frosting tip. 


Just push that into the center of the cupcake, twist it back and forth, then pull it out of the cupcake.  Most of the time, you get a nice little cylinder of cake that can be replaced after the filling is added.  But really, who cares how nice it looks?  It will be covered with frosting eventually anyway, so even if they don’t look too great, they are definitely usable.  

I filled the cored area with peppermint chocolate ganache and drizzled some over the top of the cupcake (in the spirit of a simple syrup), then replaced the cake cylinder.  


Then I topped them with peppermint buttercream frosting and crushed bits of candy canes.  They were incredible…but very, very rich.  I am someone who eats frosting by the spoonful, but I could only eat one half of a cupcake before setting it aside.  Consider yourself warned.


Peppermint chocolate ganache
  •  4 oz. milk chocolate chips (I used ghiradhelli)
  • ½ cup heavy whipping cream 
  • ¼ tsp peppermint extract
Place the chocolate chips in a glass dish.  Heat the whipping cream on the stove top until hot but not boiling, then pour over the chocolate chips.  Cover with plastic wrap and set aside for several minutes, add the peppermint extract, and stir until smooth.   
 
Peppermint buttercream frosting
  •  ½ cup salted butter
  •   ¼ tsp peppermint extract
  • 4 cups powdered sugar
  • 1 tsp water
Mix the butter and the peppermint extract until fluffy.  Add the powdered sugar and the water, mix well.  Humidity can really change how much water you need to add to the frosting, so if it seems too thick, add a bit more water.  If it seems like it isn’t thick enough, add a little bit of powdered sugar. 

Wednesday, December 22, 2010

Holiday trays: easy turtle candy

We made our holiday trays for neighbors last weekend, and I tried a couple of new recipes for the occasion.

First up:  homemade turtle candy.  These are simple and people love them, so they are a great addition to a dessert tray or to put in those little cello bags and tie with ribbon for a gift. 

Materials:
  • Mini pretzels
  • Rolo candy
  • A topping of choice--I used cashews, pecans, and m&m's.
  • Chocolate (to drizzle over the top...this is optional)
Lay out the pretzels in a single layer on a cookie sheet and top each one with a Rolo.  I hate unwrapping all of those individual candies, but it's worth it in the end.

Heat the oven to 100 degrees, then shut it off.  Put the pretzel/Rolos in the oven for five to 10 minutes until they soften up.


Top each one with whatever toppings you choose.  This is sort of messy, so I cover the not so pretty parts with melted chocolate drizzle. 


Sunday, November 28, 2010

Pumpkin whoopie pies

I wanted to try whoopie pies for Thanksgiving, and what better flavor for the season than pumpkin?  I spent a fair amount of time trying to find a recipe that doesn't use Crisco; I knew that would be unacceptable to Sister Sara and I'm also generally grossed out by it.

Here they are--pretty good for a first run.


I adapted the recipe from one I found on allrecipes.com:

Pumpkin Whoopie Pies:
  For the cookie portion:
  • 2 cups all-purpose flour
  • 1 teaspoon baking powder
  • 1 teaspoon baking soda
  • 1 teaspoon ground cinnamon
  • 1/2 teaspoon ground ginger
  • 1/2 teaspoon salt
  • 1/2 cup unsalted butter, softened
  • 1 1/4 cups granulated sugar
  • 2 large eggs
  • 1 1/2 cups of packed pumpkin
  • 1 teaspoon vanilla extract
Beat the sugar and butter until fluffy, then add the eggs by incorporating them one at a time.  Then the pumpkin and vanilla.  Once that is all well combined, add the sifted dry ingredients.

Bake at 350 on parchment paper lined cookie sheets for about 10-12 minutes. I used a little cookie dough scoop to try to keep them about the same size.

I covered them since I made them a day ahead and filled them on Thanksgiving day with cream cheese frosting. I covered them tightly and would not be so rigid about that the next time--they were a bit sticky the next day.

Since I really don't like pumpkin and Thanksgiving is a day that I absolutely want my sweets, I had to bring a couple of stand-by desserts in case there were others who would not be interested in that flavor.

I set up a dessert bar that consisted of the pumpkin whoopie pies, Reese's peanut butter cup brownies, chocolate cupcakes with raspberry buttercream frosting, red velvet cupcakes with cream cheese frosting, and a triple chocolate cheesecake.


So now it's back to the regular routine of work and school around our house...we are all looking forward to more holiday family time in December!

Sunday, November 21, 2010

Oxidizing without toxic chemicals

This technique isn't new, but it's the first time I've tried it.  I generally use a liver of sulfer solution to oxidize my silver pieces and give the darker dimension to recessed areas.  I apply it with a small brush, wait a while, then polish the high spots on the piece with a cloth.

This weekend I finished up a few stamped silver charms I've been working on and decided to give the alternative method a try.  It's ridiculously easy:
  1. Boil an egg.
  2. Put the hard boiled egg in a plastic bag, shell and all.
  3. Smash the egg.  (I just gave it a quick punch on the counter...quite satisfying, actually.)
  4. Add the metal pieces to oxidize.
I could see a change in the sterling within a couple of seconds of adding the pieces to the bag.  I left them there for a few hours and they got nice and dark with relatively no mess or worry about chemicals.  I just fished them out and tossed the egg bag away. 


Sure, the sterling is ugly right out of the bag, but the polishing cloth takes care of that quickly.  A couple of these charms became part of a mother's necklace for a friend who just had her second baby.  I waited to put it together because I wanted to add crystal accents in the birthstone color for each child and you never know until the baby shows up which birthstone color to add!  Good thing I waited...the little guy was supposed to make an entrance in mid November but was born in late October.

Sunday, November 14, 2010

Hybrid cupcakes

Hally has mentioned a couple of times (or about a thousand, maybe) that when she was in grade school, she wanted a very specific birthday cupcake for her school party.  Since her birthday falls between Halloween and Thanksgiving, she wanted cupcakes made in a Halloween wrapper that looked like a turkey on top.  It sounds like she got a part of that order, but not all put together the way she envisioned.

So this year for her birthday, I made her the cupcakes she wanted when she was eight.

First, the turkey toppers.  I made them using Bakerella's cake pop method...and every time I make those things, I swear I won't make them again.  They just take for. ev. er.  But there are times when a situation calls for cake pops, and this was one of them.

I used chocolate cake and cream cheese frosting for the base of the cake pop and covered it in chocolate.  Then I attached the embellishments with melted chocolate.  I really like how....alarmed they all look.


I got Halloween-y cupcake wrappers and picks on clearance and used those to make the other half of Hally's vision come true.


Hally's boyfriend planned a little surprise birthday party for her at the bowling alley where she works.  We had the place all to ourselves and had a great time--happy birthday, Hal!

Saturday, November 6, 2010

Halloween wrap up: Mummy cookies and the costume

Last weekend was sort of a blur.  We had Ben's birthday party (small, but an affair nonetheless), pumpkin carving, baking, and trick or treating on the agenda.

I made these cookies to give to neighbors and family members on our trick or treating route.  If they are going to dump a mountain of sweets at my house to tempt me for the week after Halloween, I figure I can return the favor.

Materials:
  • Nutter Butter cookies
  • Almond bark or chocolate melts
  • Reese's Pieces baking bits--the little guys
First, I dunked the Nutter Butters in the melted chocolate.  (I tinted mine a light orange, but I have also made these with a sort of sickly looking green and that looked good too.)


Then I added Reese's Pieces eyes, using a little bit of melted chocolate for glue.


I dragged lines of white chocolate across the coated cookies to mummify them
 
  
and let them set up on the counter for about half an hour before packaging.


I used my Foodsaver to heat seal the cello bags that became their new home and added these little labels I found a couple of months ago. (Hobby Lobby?  I can't remember, sorry.)


Once the treats were ready, we turned our attention to getting costumed up to go out.

A couple of months ago, Ben announced his intent to be a Despicable Me Minion for Halloween--a one-eyed Minion, to be specific.  One of these guys, from the movie:


I looked around for the costumes that were available online and they left a lot to be desired, IMO.  So I decided to make one for him.

Now, when I sew things, I don't follow patterns.  I wave them off like I don't need them.  But the truth is, I can't make sense of them.  If I try to use patterns, I get frustrated and cranky and sometimes end up balling up all of the materials and dumping them in the trash in a fit of rage.  My strategy is generally to buy about three times as much fabric as something is supposed to take and feel fortunate if I can pull it together on the second or third try.  The whole process is very touch and go and I don't ever really know until I'm done if it will work out.  So in the back of my mind, I was prepared to go out last minute and find some other costume if needed.

Here is what we ended up with--not professional quality, but it definitely did the trick.  People seemed to know what Ben was supposed to be (ok, my brother thought he was supposed to be some sort of doctor, but in my defense, I don't think he has seen the movie!) and he loved it.  We had a great evening--the weather was perfect and Ben got quite a stash of candy to share. 

Saturday, October 30, 2010

Glowing sugar for a special order

I asked Ben what kind of cake he wanted for his birthday, and I swear he had to have been saving this up.  The order: A boy, trick-or-treating in a ghost costume, with glowing red eyes and a candy bag next to him that was as tall as he was.  Oh, and a number six coming out of the bag.

I immediately wanted to point out that glowing red eyes changed the boy to something sinister, but the customer is always right.  Especially for his birthday.  

I made a chocolate bag to put next to the ghost-boy-creature first, then made a batch of poured sugar with this recipe for the glowing eyes.


I found some little battery-operated LED lights in the wedding section at Michaels (at the second Michaels I went to, so if you go looking for these, they may not have them at every store).


When I pulled the sugar off the stove, I added the red coloring and poured it into this silicone mold.  Then I waited.  I was nervous about plunging those plastic covered lights into 300 degree pool, but at some point I knew the sugar would be less forgiving and I wouldn't be able to get them in there.  I poured six molds in the hope of ending up with two that worked. 


As they cooled, all six of them flickered and went out at one point or another.  But eventually, they all came back on.  (Side note:  those lights boast a glow for eight hours. I put the remaining eyes aside to see how long they would last.  One week later, they were still glowing!)

I made the ghost with two six inch cakes and one half of the ball pan, covered in fondant.  I added the sugar eyes (first I covered the back of each eye with a little ball of fondant to keep the plastic materials out of the cake) the chocolate bag, and finally, the number six candle.


Generally, when I make cakes, I bake them the night before I need them and put them in the fridge overnight to help with stability.  I didn't do this with the ghost cake.  I was unwilling to put the cake in there with a red-onion-filled salad.  A thick coat of saran wrap is no match for onions, and I decided to do a flash freeze the next morning instead...but never got around to it.  So after I got it all assembled, the weight of the fondant started to make the ghost-boy a little...fatter.  And fatter.  I'm going to blame it on all of the Halloween candy the kid-ghost would have ingested. 


Ben was happy, so I was happy!


Monday, October 25, 2010

Chocolate bags

Apparently, lots of people know you can make bags out of chocolate.  It was news to me, though, and when I heard about it a couple of weeks ago I knew I had to give it a try.  And Ben's order for his birthday cake gave me the perfect opportunity. 

I have to admit that this is incredibly easy, so that makes it considerably less impressive.  But here's how it's done:

Materials
  • chocolate melts or tempered chocolate
  • unused coffee bags (how you get these is up to you.  I spent a lot of time spinning elaborate tales about why I needed extra bags with no coffee beans in them, but you can probably just ask if you can buy them at the store)
  • pastry brush
The coffee bags are important because they have a slick lining in them that helps with removal once the chocolate cools.  I decided to do two bags in case one failed.  One was really flexible and the other was pretty rigid, so I figured one of them would work out.

Melt the chocolate.  I needed a black chocolate bag, so I totally cheated and bought black chocolate melts. (One time, probably seven or eight years ago, one of my best friends told me she refused to split her grocery shopping between three stores to save nickels and dimes here and there.  She said, "my time is worth something".  So that's what I say to myself every time I decide to pay a bit more for something to save myself some time.  I don't really buy into it since I'm a chronic overdoer, but it works in the moment.)


Cut the top portion of the bag off--down to whatever size you want your chocolate bag to be.


Use the pastry brush to paint the melted chocolate into the corners of the coffee bag and let that layer cool.  Then paint the rest of the inside of the bag and let it cool.  Keep adding layers of the chocolate "paint" until you think it's thick enough.  


I probably went overboard on the thickness, but when the bags were done I had no concerns that they would hold up if they survived the unmasking ceremony.

Put the bags in the refrigerator for 15 minutes.  This isn't totally necessary for the cooling, but I have found that if I let chocolate cool at room temperature instead of giving it that blast of cold, it seems to sort of disintegrate when I touch it.  The fridge gives it some sort of stability you don't get when you leave it on the counter.

Remove from the fridge and peel the bag away.  I just went to the bottom of the bag where the seam was and pulled from there...simple.

I didn't need two bags; they both worked out really well.  I decided I liked the look of the one that came from the more flexible coffee bag better for the cake I was making, since I had to stuff it and it sort of sagged to provide a better opening to do that.


I won't lie, I think this is pretty awesome.  Mostly because of the detail you get in the seams and folds.  But also, the whole project took less than half an hour--including fridge time.

Wednesday, October 20, 2010

Texturing hammers

I have coveted a rolling mill for years. I love the textural possibilities it brings to metal, so every time I see the results another artist gets with their rolling mill, I shop around online to compare prices. But I always ultimately decide that I don't want to buy something in the moment that is super cheap (still $250!) and later wish I had waited until I could afford something better.   

I got a catalog in the mail from Kingsley North a few weeks ago.  I generally groan when I get those giant volumes.  They just take up space and since Lowell is a recycling ninja who also believes that everyone is trying to steal our identities, it means that I have to flip through the catalog and make sure that all identifying information is out of there before dumping it in the bin.  Once (one time!), I missed that center form where the company has pre-filled your address information and Lowell simply pulled it out and dangled it in a floppy hand off his hip, wearing a look that said I was totally, hopelessly irresponsible. So I don't want to relive that.  Besides, I prefer to buy jewelry making supplies online...it's just easier.

So when this catalog showed up, I wasn't too thrilled.  Also, I had never heard of the company before, so I was a little bit suspicious.  But I noticed something about new texturing hammers on the front of the catalog and had to at least take a look.  I have seen hammers like this from other companies, but they had changeable hammer faces and my experience with that sort of thing has not been great.  KN had three kinds with different texturing elements on each side of the hammer head--bubbles, lines, squares. They looked promising and really didn't cost much, so I went against my intuition and ordered the hammers.  

And they are glorious. 

Side one:

Side two:


Bottom line, I love them.  I still have clean-up to do on these pieces, but here are my results from the first run:


Saturday, October 9, 2010

Beer-flavored cake

I have to start this post by apologizing to my brother Paul, the recipient of the first beer bottle cake I made.  Had I really thought things through, I would have made him a beer-flavored cake as well.  Sorry, Paul...next time, really.

I made cupcakes and a groom's cake for a wedding reception last weekend.  When I asked what flavor they wanted, the groom said, "beer".  We moved on and the cupcakes were assorted vanilla, chocolate, and red velvet.  But I found several recipes online for Guinness beer cake to use for the groom's cake and decided to go with it.


For the cake, I used a Dark Chocolate cake mix and just replaced the liquid the instructions called for with the Guinness beer.  Before adding it, I reduced it on the stove by simmering it on low heat for about 15 minutes.  Then I mixed and baked the cake as directed on the box. 

When I taste-tested this, I couldn't really taste the beer.  The cake was very rich and moist...very chocolate.  No beer flavor that I could tell.  Not a bad thing, but the beer flavor was the whole point.

But that was just the beginning.   I reduced another two cups of the Guinness and used that to brush the cake like a simple syrup.  Then I made Guinness buttercream frosting.  This was very touch and go, since I couldn't find much for a recipe.  Poor Lowell had to taste test it for me three times (what.  I don't have the slightest interest in tasting frosting that is not perfectly sweet--what if it ruined frosting for me?  Also, the smell of stout at 10 am simmering on the stove was making me slightly queasy) before I decided it was just time to put it on the cake and call it good. Even then, he said he really couldn't taste anything but "frosting". But there is only so much liquid you can add to frosting before it becomes glaze, and that was not what I needed.

Guinness Buttercream Frosting
1/2 cup unsalted butter
4 1/2 cups powdered sugar
Approximately 5-6 Tablespoons Guinness

I doubled the cake and frosting recipes to make the double layer 9 inch cake and used the Guinness frosting for the filling and the crumb coat.  I covered the cake in fondant and sprayed it a gray-silver color to look sort of like a metal bucket.

Earlier in the week, I made a batch of poured sugar ice and a sugar beer bottle using my silicone mold.  The groom's favorite beer is Miller Lite, so I bought a six pack of the beer and soaked one of the bottles in the sink until the label peeled off easily.  I used that to create an edible image, and added that to the sugar bottle.


I might be willing to admit that I'm a little bit proud of how the bottle and the ice turned out. 


Just a little.
Ok, it was hard to actually just put the cake down on the table and walk away.  But I did.  And I also gave the groom the six pack of Miller Lite, label-less bottle and all.

The bride told me that they all loved the cake and it was very moist, but that she could really only taste the Guinness in the frosting.  She complimented the amount, though, and said it was detectable but not overwhelming.  Success!


Tuesday, October 5, 2010

Etsy treasuries--who knew?


I started my Etsy shop in earnest a few months ago.  I decided I will phase out the website and use Etsy because it's so much cheaper and I'm soooooo bad at marketing my stuff.   I really just need a place to have something "out there" and a way for people to find me and contact me for jewelry. 

Shortly after listing a few items, I got a "convo" (this is Etsian for "conversation") from someone saying she had put my necklace in a treasury (that's Etsian for little collections that members put together, often with some sort of theme.  Sometimes people comment on them or shop by going through them...basically, it's a nice way to get some exposure.  When you go to the Etsy home page, the majority of what you see there is someone's treasury).  So I took a peek.  She had put my amethyst and sterling necklace in a treasury with a sort of dark, gothic feel to it.  I have to admit, it felt kind of cool.  (Then I worried briefly that maybe THAT was my 15 minutes of fame???  I guess it's better than making the paper for being arrested on a drug charge.) 

So a couple of days later, I made my own treasury.  It was fun, just surfing around to find items that I thought would fit into my little collection.  Soon after, I made another one.  Before I knew it, I became sort of hooked on making treasuries.  I would come home from work in the evenings and do searches on the laptop for 15 or 20 minutes while dinner was on the stove. I put items in little collections based on a feeling or color or an event. Serenity.  Halloween.  Cake.  (There is some seriously awesome stuff on there.  Seriously.)  This treasury is my current favorite (probably because people commented and told me I was clever...I'm a sucker for that kind of thing).

I like the idea of supporting handmade items, and I like how much weird and interesting stuff Etsy has to offer. There is even a feature to "shop local" that filters out the artists in your area.  And some of the pictures are stunning--so many of the photographs are creative and artistic--it's incredible. I had no idea. 

I don't know that I will ever sell anything from my shop, but I think I will keep popping in to do treasuries here and there--if you haven't checked it out, you may want to the next time you need a gift!

Friday, October 1, 2010

Cakeapalooza

I've sort of fallen off the face of the earth in everything I do online lately.  I haven't gone to the forums to check out what's going on, I've fallen way behind on the blogs I follow, and I obviously haven't been posting anything here lately. 

I've been caking in most of my down time.  I made two big cakes for baby showers last Saturday and worked at the bakery on Sunday.  This weekend, I'm making 100 cupcakes and a groom's cake for a wedding.  And after that, I think I just have a regular sized cake to do every weekend through the end of October, getting easier as I go.  I delivered both cakes last weekend on time and there was only a brief period when I considered putting my fist through the second one, so I say that was a successful cake weekend.

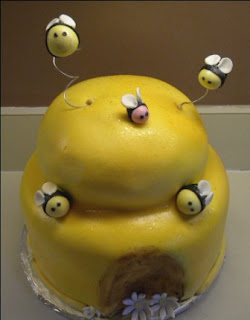
The first one was sort of fun--a double layered white cake with chocolate buttercream filling for the base and a chocolate cake with raspberry buttercream filling for the top.  I covered both tiers with cream cheese frosting and marshmallow fondant.


I think the fondant bees were the best part.


That cake went out late morning.  I was relieved that I didn't have to color any fondant for the second one, but it was GIANT.  Three layers of cake on the bottom and two on the top--same flavor combinations as the first--that thing was heavy. (Incidentally, the three layers on the bottom were the problem when I almost lost it and punched the cake.  I rolled out the fondant FOUR TIMES before I got enough to actually cover it.  Seriously.  My forearm muscles were extremely sore on Monday when I went back to my day job.)


This one was my gift for a friend I work with at the bakery.  I've witnessed an awkward moment more than once when a party is being planned for someone who makes cakes...there is usually some dead air when the issue of the cake comes up. I don't think anyone was going to ask her to make her own cake, but you do wonder--what do you get for the person who makes five tier cakes for other people?  I volunteered and it worked out great; the party planner couldn't have been more organized and gave me clear instructions about what she wanted.  Plus, I didn't have to stack that monster and try to transport it all put together.  I took it in separate pieces to the shower and added a border between the tiers when I got there.

So the biggest cake weekend is over.  It's all downhill from here, right?

Wednesday, September 22, 2010

Sterling and hematite necklace

I started this necklace several weeks ago, but kept running into trouble about what to do for the chain.  I made a sterling link chain for it initially, but it was too big for the pendant and looked terrible when I added it.  So I used that chain on the shapes necklace I posted earlier this month and kept messing around with this one.

Martha Stewart says to plant bulbs in threes and fives (or maybe she didn't, but someone told me she did), and I tend to think about that when I am mapping out a project.  I don't always stick to it, but I definitely start from there--the odd numbers do generally look better.

I used scalloped bezel wire and cut the back plate to mimic that pattern. I planned on putting a rivet at one end and hang the pendant vertically, but I couldn't shake the image of a snowman when I looked at it that way.  See it?  That made me think for one fleeting moment that maybe I should try sketching my ideas before I cut the silver.     


So I turned it horizontally, added sterling rivets, and used a scribe to add some random lines for texture.


After trying a couple of chain options, I finally settled on a leather cord instead.