Saturday, December 22, 2012

Christmas crack.

My aunt used to make some type of holiday chex mix with white chocolate that she called Bad Ass Trail Mix.  (My siblings and I also referred to it as the Fat Ass Trail Mix because we couldn't stop eating it.)  This year I decided to give the recipe a shot, but I can't totally remember everything that was in it.  So this may be close, but it may be missing some things too.  Here is what I'm sure of:  it makes a HUGE amount.  As in so much I'm not quite sure what I will do with it all.  I wonder if it will freeze?  I may have to try that.


I'm calling this mixture Christmas Crack.  It has enough salt to cut the sweetness and it's hard to stop eating it.

1 box of Corn Chex cereal
1 container of peanuts
1 bag of pretzel sticks
1 bag of chocolate m&ms
1 block of almond bark or white chocolate

Mix the cereal, pretzels, m&ms and peanuts in a large bowl.  Melt the chocolate in a glass dish by microwaving it for 30 seconds, then stirring and microwaving for another 30 seconds if necessary. (Don't just put the dish in the microwave for a couple of minutes to melt it in one session - this generally scalds the chocolate and ruins the consistency.)  Let the chocolate cool a few minutes, then pour it over the top of the cereal mixture and toss until covered.  Pour all of it out onto cookie sheets lined with waxed paper, allow it to cool, then break it apart and put it in tupperware containers to store.  

Sunday, December 16, 2012

Chocolate Peppermint Bark Sugar Cookies

I'm generally not too interested in having mint in sweets, but I make an exception for these cookies - I love these. They get a great response from anyone who tries them...there is something about the combination of the soft sugar cookie with the chocolate and hint of peppermint that is just right. This recipe makes a huge batch, but these will freeze up to a couple of weeks really well so they are a good make ahead option for the holidays.


Chocolate Peppermint Bark Sugar Cookies    (adapted from Bon Appetit)
Ingredients:
4 cups all purpose flour
1/2 teaspoon salt
2 cups (4 sticks) salted butter, at room temperature
2 cups granulated sugar
2 teaspoon vanilla extract
2 large egg yolk
1 bag semisweet mini chocolate chips
1 bag Hershey's Candy Cane Kisses – chopped
7 ounces white chocolate


Several crumbled mini candy canes

Directions:
1. Preheat oven to 350°F. Use a large metal cookie sheet with sides/jelly roll pan (13 x 9 x 2) and lightly spray the bottom of the pan with nonstick spray. Line bottom of pan with long strip of parchment paper, leaving overhang on both short sides of pan.   

2. In a mixing bowl, whip the butter until creamy, about 2 minutes. Gradually beat in sugar. Continue beating until mixture is light and fluffy. Beat in vanilla, then egg yolks. Gradually add flour and salt, beating on low speed until just blended.

3. Drop dough by tablespoonfuls into prepared baking pan. Using moistened fingertips, press dough to form even layer over bottom of pan. Pierce dough all over with fork.

4. Bake cookie base until light golden brown and slightly puffed and edges begin to come away from sides of pan, start checking about 20 minutes (baking time will vary depending on how thick the sugar cookie layer is).  Place pan on rack; immediately sprinkle chocolate chips over the top. Let stand until chocolate softens, about 3 minutes. Using small offset spatula, spread chocolate chips over top of cookie in thin even layer. Immediately sprinkle chopped candy cane kisses  and candy cane pieces over the top.

5. Melt white chocolate in the microwave in 30 second bursts, stirring in between. Using fork, drizzle white chocolate all over cookies. Chill until white chocolate is set, about 30 minutes.
6. Using paper overhang as aid, lift cookie from pan and transfer to work surface. Using large knife, cut cookie into irregular pieces.

*Store in refrigerator (or freezer) in airtight containers between layers of waxed paper or parchment paper. Can be stored in the freezer for several weeks.

Wednesday, December 12, 2012

Lemon quartz pendant

I made this mother's pendant for my sister.  I was set on an October birthday, opals in hand.  But my nephew decided to wait until November to arrive, so I needed a yellow stone.  The citrines that I found all seemed so dark yellow that I settled on a lemon quartz instead - the yellow is paler and seemed a little easier to pair with everyday clothes.  And just...happier.

It's sort of like this pendant I made for another sister a couple of years ago. I like the simplicity of the setting because all of the focus is on the stone and I'm in love all of the facets in the quartz - it really catches the light.


Friday, November 16, 2012

Pink zebra stripe cake

I made this cake for a ten year old's birthday party.  She wanted a red velvet cake with hot pink zebra stripes but wasn't having a large number of guests.  So we settled on a double layer six inch cake to get the look she was going for (these are still pretty big...they end up being about four inches tall so they will feed 11 or 12 people) and a dozen cupcakes for ease.
 
Red velvet under white fondant can be tricky - I like to wrap the cake up really well in plastic wrap to keep the air out, freeze it for at least an hour, then do a crumb coat and chill again.  Once that initial coat is on, it's easier to smooth the cake and add the fondant without a bunch of red crumbs showing through. 


Thursday, November 8, 2012

Fold formed copper with a heat patina

I have spent several hours fold forming copper over the past couple of weekends.  Generally I toss the copper pieces in the pickle solution like I would with sterling when I'm done working on them with the torch, but this time I skipped that step to try to keep some of the flame coloring in the metal. I love the outcome; there are hints of orange that look more red in certain lighting.

I ended up with a giant fold formed cuff bracelet and four pairs of earrings (two of those sets look very similar...maybe I need to keep one?).


I'm a big fan of fold forming, especially in copper.  Each piece turns out a little bit different and it adds interest and texture.  And the addition of sterling rivets?  Amazing.


Friday, November 2, 2012

Not a spinner ring.

I've been making a lot of spinner rings lately, but I just had a custom order request for a ring that looks like a spinner ring without all of the, well, spinning.  The woman was ordering it for her husband and she liked the look of the additional band but didn't think he would really be "into" the movement.  So I made two of them with a smooth sterling band on the bottom and a textured copper band on top - one to send out and one to put in my Etsy shop.


Tuesday, October 30, 2012

Hand bracelets

I caught my first glimpse of a hand bracelet on a model in a recap of NY Fashion Week. But that was it - just a glimpse. And my Google searches garnered only a small group of images.  The hand bracelets I could find were very dainty and ornate...not my style. I finally decided to give up the searching and just try making a couple with heavy sterling wire.


I did a little test drive with them to make sure I didn't miss the mark on the angles and I'm happy with the outcome - now I just have to talk myself out of keeping one...

Sunday, October 28, 2012

Graveyard cake

Ben helped me design the cake for his birthday party - he wanted a graveyard cake to go along with his Halloween-themed party favors. He picked a red velvet cake with cream cheese frosting and approved all of the individual elements as I was decorating. 


I considered making some of the elements out of fondant, but decided against it since the cake was for a group of eight year old boys.  So all of the decorations are chocolate.  I piped the chocolate fence, skulls and crossbones, and the tombstones and used chocolate rocks for the pathway.  We added some LED lights behind the tombstones to give some illumination - they looked great in the lower light of the party.  I love those things - I used them in Ben's ghost cake and his Monster House cake and when everything is over, I just clean them up and turn them off to use again another time.

Sunday, October 21, 2012

Dracula Halloween

Ben is all about Dracula this season.  We saw the movie Hotel Transylvania several weeks ago when it opened (which was surprisingly entertaining from my point of view - I had very low expectations but really enjoyed it) and after that, he decided he wanted to be Dracula for Halloween. He also asked for a Dracula cake for his birthday - specifically, Dracula resting in his coffin.

Here is Dracula getting ready to go to a Halloween celebration at the zoo:


And later, we had a family celebration for Ben's birthday with his Dracula cake. 


The coffin is cake and the lid is made with rice krispie treats - all covered in fondant.  Dracula is technically edible, all fondant.  The skulls and bones are all chocolate made in silicone molds. Happy Birthday, Ben!

Wednesday, October 17, 2012

Giveaway!

I'm trying out a new giveaway app on my Ellies Jewels Facebook page...go enter!


Here are the details:
The winner of the giveaway will choose one of two personalized items: either
  • a sterling and crystal pendant or
  • a set of intital stacking rings
All you have to do is "like" the Ellies Jewels FB page and fill out the sweepstakes entry form. If you have already liked the page, just fill out the form and you are entered.  Once you get to the page, select the giveaway app at the top of the page near the photo albums, etc.  The process is really quick and easy, I promise.

The winner will be chosen November 3, 2012 using a random number generator and notified by November 4, 2012. The chosen item will be custom created based on personalization desired and mailed via USPS first class mail within a week of the notification/details being worked out for the personalization. (I think that should be *plenty* of time to give this extremely fun yet personal gift to a loved one if you hate sterling jewelry or don't really wear jewelry. See? You should still enter to win.)

There are no limitations placed on who can enter...friends, family, acquaintances, everyone is eligible to win. Let's face it, there aren't that many fans of that page and many of them know me personally or know me vicariously through a sibling. So go enter!

Here are some sample pictures of the personalized pendants and the stacking rings I make...I will work with the winner around the details once the giveaway ends.


Sunday, October 14, 2012

Side trip: Midwestern wedding how to

Ok, so the obvious disclaimer on this "how to" is that you have to have an enormous family willing to pitch in to make the event successful.  And also access to a home on a large piece of property in the middle of the United States.  But if you don't have these things and want this experience, I bet I know where you can access all of it to rent out for a weekend!

Element #1:  Gorgeous backdrop.

My parents have a house in the country on beautiful land.  They got this little archway to put up and surrounded it with flowers and bales of hay for guest seating.


This huge planter is an upcycled old satellite dish.  Genious?  I think so. 


If you time it right, you can get some great sunset photos.


Element #2: Mason jars, mason jars, mason jars.

Mason jar lights hanging in the trees, twinkling to light up the pathways and line the property as it got dark.


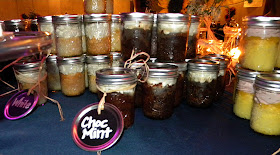
Mason jars filled with cake.


Element #3:  A family who gets involved in all aspects.

Brothers, sisters, in-laws, cousins, nephews, friends...people willing to pitch in and clean, bake, organize, rearrange seating, make an occasional emergency batch of coleslaw, create table decor, and anything else that needs to be done.

A sister who home brews brought two kegs:  one of Caribou Slobber and one of Breakwater Ale.


A brother who is an A/V genius.


A photographer sister.  In this case, the bride...so she developed an incredible way to capture images even though she wasn't able to be the one taking the images: an outdoor DIY photo booth!  It was a huge hit - these pictures were taken long after the sun set:


Element #4:  A plan for the end of the event.

Since this really was out in the country, my parents arranged for a bus (yes, a big yellow school bus) to drive guests from the hotel about 45 miles away to the wedding and drive them all safely back at the end of the evening.  No worries about people driving after having a beer or two.  Everyone got home safely, and as the bus pulled out onto the country road, the event cleanup got underway.

Sunday, October 7, 2012

Domed cut out earrings

The materials for these earrings are minimal; just three metal circles and sterling wire.  But I spent a lot of time dapping and hammering the pieces to prepare them for connection.


I sawed a sterling disk into two pieces then hammered and dapped them before soldering them to the copper circles.  On the finished earrings it isn't too obvious, but the sterling cut outs are like little puzzle pieces.  


I polished and oxidized the pieces before hanging them from sterling wires.  I love the texture and the interest the domed silver adds - it creates a little pocket on each earring.