Wednesday, June 30, 2010

It's not going to take forever, Hally!

My youngest sister was born when I was 16.  We didn't share much in our childhoods, but we live in the same city now and I have had the chance to spend more time with her over the past few years. Hally is really creative and has an amazing ability to see beauty in what most people consider to be ordinary. 

When Hally is with us, she and Ben pal around quite a bit.  His endless energy seems charming to her long after others are ready for a break.  A few weeks ago she gave Ben a video she had put together of him during a visit at my parents' house, and it was nothing short of amazing.  She truly has a talent for editing, audio, timing, angles...whatever else goes into making a video clip really "work". 

Hally came over to visit one evening several months ago with this bag for me:


Yes, that's what was really in the bag, and she was hoping I could make her a pair of earrings.  Out of her teeth.  I was thinking a pendant with resin to suspend them, and she said that would be ok, but I could tell she was really hoping for earrings.  At the time, it was cold and I wasn't able to get to my workbench in the garage much.  I put the bag aside to wait for warmer weather and inspiration about how to handle a pair of tooth earrings.

Last weekend, I opened the bag to see what I really had to work with. 


I wanted the end result to be a pair of earrings that just looked like...ordinary earrings.  Until you got closer.  I used the dapping block to dome two silver discs and drilled a center hole through each, then used sterling wire to wrap the teeth and extend through the top of the silver discs.  For stability, I put a small dab of E6000 on the wire at the top and the bottom of the tooth.  It dries clear and is flexible, so I'm hoping it can absorb any shock and help keep the teeth inside the wire cage.  The discs sort of spin, so it's very hard to get a good picture of them.  Maybe Hally can give me one that she takes--she's much better at that than I am. 


In one part of the video that Hally gave Ben, he is coloring a giant picture on an easel and Hally can be heard off screen saying something about how it will take forever.  Ben responds, "it's not going to take forever, Hally!"  She probably wondered if it was going to take me forever to make those earrings, too...

Monday, June 28, 2010

Side trip: flower garden

This year we planted wildflowers in a flower bed notorious for refusing to cooperate. The results have been fabulous...I guess I was trying to force things too much in past years and should just stick to what will grow naturally on the side of the road around here.

I took pictures of the sunflowers and echinacea over a few days as they opened up at different times of day--early in the morning or late afternoon. I am very drawn to the echinacea early on in the blooming process because I love the harsh, spiky centers. When I'm running, I see thistle growing and promise myself often to return with the camera to different spots to take pictures of the thistle heads for the same reason. I never have, though. I know thistle is an aggressive, hateful weed, but I think it's beautiful. Good for a yard? No. But so pretty...


Friday, June 25, 2010

Chasing and repousse

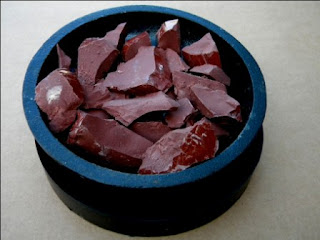
I decided to try chasing and repousse last weekend. I got a book by Nancy Corwin several months ago and it seemed like something I could eventually try.  Like so many other jewelry projects, I collected the materials over time and had everything I needed to give it a shot.  I got out my pitch bowl and filled it with chunks of the red pitch I got from Rio Grande. 


I should mention that this was not my first attempt at setting up the pitch. However, the first time, I had black pitch. I read that the black pitch was really not the way to go because the red variety was much more pliable, but the black pitch was SO much cheaper.  It came in some sort of tin can and was extremely brittle. The pieces that I got into the pitch bowl resembled jagged, broken glass. When I heated it to put a piece of metal into it, the metal wouldn’t really sink into it and would often break—almost snap, really—away from the pitch when I checked to see if it was secure. So I put it aside and eventually ordered the red pitch. What a difference! I chiseled pieces of the pitch away from the block form easily; the pieces were sort of soft and dense. (I’m not sure why it comes in a giant block…I only put about one sixth of it into my pitch bowl.)

The pitch melted easily and smoothly.


I used a piece of copper and drew circles on it with my template. Then I went over the lines with a scribe to give my chasing tools a guide to follow.


The basic process goes something like this: heat the pitch to soften it and place the metal on it. Then chase on one side of the piece, outlining the design. Heat the pitch again to loosen the metal, flip it over, and work the metal on the opposite side to give it depth. Repeat, repeat, repeat. Well, most people probably wouldn’t repeat as much as I did—I was experimenting with moving the lines a bit and just getting the feel in general, so I know that I overworked the metal. In fact, I was surprised that I didn’t ever actually go through it.

The chasing tools and hammer I used:


Here is the piece, early in the process and at the end, prior to cleaning.


And as final as this will get--I didn't want to spend much time trying to clean it up since it is just a tester.


Some notes for future attempts:
  1.  Sometimes being a cheapskate can make things harder.  I should have just bought the red pitch to begin with.  (Ok, I didn't actually learn that lesson just now, and I probably won't follow it in the future.  The force is too strong in me.)
  2.   There is NO NEED to push the entire piece all the way down in the pitch.  It makes a mess to clean off when flipping the piece and I found that pushing just the corners in worked well. 
  3.   I need to do a bit of research on how to really clean a piece like this.  I didn't put it in the pickle pot because I didn't want to get any pitch in there, but I'm not sure what the proper procedure is.  Not a big deal on a test piece, but it will matter later. 

I have a lot of practice time in front of me if I am going to make anything using this technique, but I like the challenge, so maybe I will have more of this to post down the line.

Thursday, June 24, 2010

More, more, more

When Ben was beginning to talk, he used sign language for some of his communication. He would sign "more" to us by bringing his hands together in front of his chest over and over with all of the fingertips touching. Eventually, it became his first word (and for quite a while, his only word), and he would say it while signing. He would practically chant "more, more, more".

That's what I thought of when I was making all of these things. Not new techniques. More, more, more.

A fold formed copper cuff (about an inch wide) with sterling rivets added in:


More spinner rings--trying out some other textures.


And another tube set amethyst pendant with silver shavings fused to the front of the sterling surface for some texture.  That's right, I save everything I can at my work bench.  I even catch the silver that falls away while doing rough filing and sawing.  It makes the cheapskate in my heart sing. 

Saturday, June 19, 2010

Lemon quartz and crystal earrings

My love affair with faceted gems continues...

These lemon quartz briolettes are so tiny that it took me a while to decide what to do with them. I've had them for several months and kept getting them out to use without success. I do like how they hang from the matte sterling discs here, though.


I took this picture outside, and while it's not a good one to really see the earrings, the lemon quartz looks pretty incredible!


I also made a simple pair of hammered sterling hoops with Swarovski crystals.

Thursday, June 17, 2010

More bursts

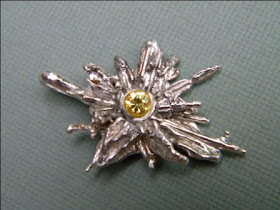
I used the last of the smaller broom cast pieces to make a couple more sunburst pieces with faceted stones. These are smaller than the first one I did--both are about the size of a dime. I guess I will need to do more broom casting soon to see what else I can come up with!


Wednesday, June 16, 2010

Textured earrings

I used a chasing tool to texture the sterling discs on these earrings and then shaped them with a dapping block before adding the beaded components. I recently got a wood block for just this type of work--I was hoping that the wood might be more forgiving on the texture I add to my metal pieces than my steel block. It seemed to do the trick--I was able to get a nice domed shape on the sterling without losing any of the details.

The first pair is fairly simple--turquoise beads and oxidized sterling discs on wires:


Next, my first attempt at post earrings. My mom suggested I make some a few years ago and I wasn't that interested...but it seems like I have seen more people wearing them recently. I have always preferred wires, so that was what I made.
I added copper rivets and bamboo coral to the discs, and I love how they look. (Not that I would ever wear them...post earrings generally annoy me!)

Sunday, June 13, 2010

Winner!

I know several people who seem to win a lot of things. Contests on the radio, playing at the casino, whatever. They just seem to be very lucky. I'm not one of those people. Sure, I don't try to win very many things, and there is the saying that 'you can't win if you don't play.' But honestly, even when I HAVE entered contests, I didn't win.

When I started blogging, I started following other blogs as well. When there is a giveaway on those blogs, I usually enter to win if I am even remotely interested in the prizes. But I do so without any hope of actually getting any of them.

That changed when I won some beautiful gemstones in a giveaway on Melissa Muir's blog. I started laying them out with different design options as soon as they arrived, and finally settled on a pair of earrings for the peridot and a pendant for the amethyst. I used 24 gauge sterling silver discs and added texture with a chasing tool to hang with the gemstones. I love them!


Saturday, June 12, 2010

Picnic cupcakes

Today we went to Ben's annual class picnic. This is one of those events that as a parent, I feel obligated to attend, but dread. It's always hot and muggy and awkward. The teachers have been wonderful, and I generally opt to help with set up and then settle in to watch Ben play until it's time to go. But. Ben has a great time, and we have fun deciding what dessert to bring along. Last year, we took sunflower cupcakes, so we needed a new idea.

This morning, we went through the What's New, Cupcake? book that has some cute designs. Ben picked the ants at a picnic design, so we made white cake cupcakes and let them cool while we went to the store to get the toppings we needed.

The instructions call for chocolate covered nuts, but there are some kids with nut allergies in the class so this wasn't an option. We found regular M&Ms sorted by color for a ridiculous price. After some thought, I gave in because we probably would have had to get some huge package of the regular assorted colors to get the 100+ brown M&Ms we needed. And while the rest of the family would forget about that 50 pound bag of candy in the cabinet when the picnic was over, it would beckon to me at all hours until I ate it all. By myself. In the dark.

We frosted the cupcakes with vanilla buttercream frosting and dipped the edges in sprinkles (the book shows edging in coconut, but I have a special hatred for it and pretended not to see that), then put the chocolate on top of each cupcake. I piped chocolate legs on the little guys and we used candy fruit slices to make it look like they were carting off food from the picnic.

They were pretty simple and didn't take a huge amount of time. But I have to admit, these were much better in theory than execution. Since the M&Ms were so much flatter than the chocolate covered nuts would have been, the ants looked less like they were carrying off the food and more like they were being pulverized by it. It didn't seem to matter to the kids at the picnic, though.

Sunday, June 6, 2010

Time out for cake

Ben helped me put together the ideas for this cake. We knew we would have a giant cupcake cake delivered to us, ready to frost and decorate. We knew we wanted to use the Cricut Cake for the letters, and our instructions were to go in the direction of castle/dragon/whimsical.

I got the Make the Cut program for the Cricut Cake--it is a one time purchase rather than several cartridges and the variety of fonts and images is incredible. I found the font I wanted on the computer, then hooked the computer to the Cricut, hit a button, and it printed out the lettering for me. Simple! The lettering is what I was most hoping to get from the CC...it takes an enormous amount of time and often doesn't look uniform when I do it by hand or with cutters.


We looked at the option of doing a two dimensional dragon for the side of the cake shaped somewhat like a castle, but it just wouldn't come together. Since the actual cake portion would have to be put together quickly, I wanted to focus on the dragon and let the cake be more of a backdrop. I was not sure I could put together a 3D dragon with less than 24 hours to dry, but decided to try loading the fondant up with tylose powder to help it firm up more quickly. It worked out!

Saturday, June 5, 2010

Fold formed silver cuff

Since I liked the outcome of the fold formed copper cuff, I decided to give it a shot in sterling with a couple of variations. This one has more fold lines and I added sterling links and a clasp. When I was done polishing it, it just looked...wrong. I wish this picture was a little bit better in terms of the contrast between the cuff and the wood it's sitting on, but it's the only one I took.


I put a satin finish on it and like that much better:


Friday, June 4, 2010

Spinner rings

When I was probably 10ish, my mom got me a barrette with several tiny fabric people wearing brightly colored clothes attached to it. All lined up, like they were lying down next to each other. She told me they were "worry people", and the idea is that you tell your worries to those little dolls and they take on the burden of what is troubling you. She probably thought they were interesting and fun--and they were--but they made a big impression on me and I really talked to those little guys about my anxieties.

Years later, I discovered the "worry stones" that have a polished groove to rub your thumb in when you are anxious. Same idea, as far as I was concerned...transferring your troubles.

So even though these were introduced to me as "spinner rings", I immediately connected them to the worry people on my barrette and the worry stones I have seen in rock shops. Something to spin while I fidget.

The first time I saw them was probably a couple of years ago on the Jewelry Artists Network...Randi posted the one I saw first and I was hooked. (Incidentally, Randi referred me to the JAN from another site where I had posted a question about soldering.) I added them to my never-ending to do list.

These are made from sterling silver sheet and hammered wire. I still need to size them, but they are both pretty big--probably 9 or 10. I like the idea of wearing them on my thumb or index finger, but I suppose I will try to make some in smaller sizes eventually as well.


Wednesday, June 2, 2010

Upcycled silver: the first broom cast piece

I have heard people using the term "upcycling" in place of "recycling" recently. Ok, I get it--sort of like saying I am vertically challenged instead of short. Just to make sure I wasn't missing some new spin, I checked Wikipedia for a definition. Upcycling means reusing materials to create something of better quality or higher environmental purpose. This sort of makes me laugh because it's so subjective, and I think reusing materials for just about anything is better than tossing them away. So I declare my use of scrap silver to make a pendant upcycling.

I used some of the pieces I made during my first broom casting session and arranged them around a tube setting on a backplate. I was thinking about some sort of organic sunburst, and I love how it turned out.


I selected an amethyst from my newly acquired stash of faceted stones to set in the center, then oxidized it.