Wednesday, December 31, 2014

Holidays

Time to catch up!

We brought this beautiful girl home right before Thanksgiving:


She has a sweet demeanor and her size doesn't stop her from sitting on my lap or snuggling with us.

I spent some time working on gifts over the past couple of months, starting with a keychain for someone who has her own photography business.  I was going for a retro comic book feel and I really love how it turned out.

In progress:


And complete.  I like the rustic look and the heat patina on the copper.


I also finally finished a ring repair that I had started but set aside while waiting for materials.

In progress:


And all done:


It turns out I might have a thing for making keychains.  A couple more that were gifts:


And a softball pendant for a friend's daughter.


And my guys got me a few new pancake dies for Christmas - I can't wait to give these a test run!


Tuesday, October 28, 2014

Milk chocolate ganache buttercream frosting

That's a long name for frosting but I don't know of any other way to do it.


I made brownies for a fundraiser at work and needed a chocolate frosting to add to them. Since everyone seems to love chocolate ganache (what's not to love? Chocolate and heavy cream!) I decided to try adding that to buttercream frosting.   I don't want to brag, but the result was pretty incredible.

I'm a fan of making brownies in cupcake liners - it just makes everything much easier.  But I've learned that if I don't put a sign out letting people know exactly what they are, everyone believes they are cupcakes...I can see how that would happen.


Want to try this amazing chocolate frosting? 

First make ganache and set it aside for a few hours.  The ganache can't be too warm or it will change the consistency of the buttercream...in a bad way.  Then make the frosting and pour the ganache in, whipping until well incorporated before piping onto the brownies.

Milk Chocolate Ganache
  • 8 oz milk chocolate chips 
  • 4 oz heavy whipping cream
Heat the cream on the stove.  Put the chocolate chips into a glass bowl and pour the cream over the top.  Cover and let this rest for about five minutes then whisk.

Vanilla Buttercream Frosting
  • 1 1/2 cups salted butter at room temperature
  • 1 1/2 tsp vanilla extract
  • 4 cups powdered sugar
  • 1 Tbsp water
Mix the butter and vanilla extract until soft.  Slowly incorporate the powdered sugar and mix until well combined.  Add water as needed for consistency purposes.

Friday, September 26, 2014

Royally obsessed.

About two months ago I started watching Major League Baseball. Lowell and Ben were really into it so in the spirit of being open to trying new things I gave it a shot.  In a very short period of time I became utterly entranced with it. I got to know the Kansas City Royals players, their positions, their little rituals when they are at bat. 

We've been going to games when we can and having a blast watching the Royals climb in the standings. 

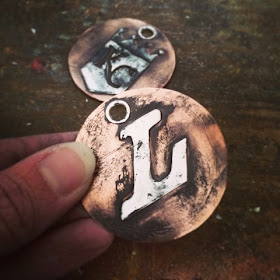
Lowell has coached me through this, answering my questions and supporting  my undying devotion to Dyson. So I wanted to make him something with the Royals logo that he could use since he isn't much of a jewelry wearer. 


I pierced the KC logo in sterling and then did a Lakers "L" for another gift. 


I cut the large backgrounds from 18 gauge copper for a good contrast. 


Before I put the split rings on I added sterling rivets and a dark patina for more contrast.  I'm happy with how they turned out - there may be more of these in my future.

Friday, August 22, 2014

Sterling tie bar

I've tried to come up with something I can make for men who don't wear jewelry but haven't had much success until now.  I think the tie bar might be a winner.


This is a simple design but I love the idea of personalizing these for gifts.  This one is for Lowell; he doesn't wear jewelry or need a tie bar often but I wanted to make him something he could wear on those days to give him a little boost.


The other nice thing about the tie bar is that I can personalize the front and also put a short hidden message detail on the back.  


I've started another one for a special occasion that will have a stone setting on the front - I'm excited to see how it turns out!

Sunday, July 27, 2014

Tree stump for the workshop

We had a pretty big storm come through in the middle of the night a couple of weeks ago.  The winds were crazy and trees were damaged all over town.  As people cleaned up their yards, tree limbs lined the streets awaiting pick up.  

After the major clean up efforts had already taken place, I mentioned to Lowell over a lunch break that I wished I would have tried to get a tree stump for metal work while all of those trees were being cut down.  

That evening, this is what our driveway looked like:


Apparently he saw someone cutting down a damaged tree on his way back to work and stopped to see if he could take some of the stumps.  

I picked through them to decide which I wanted to keep....the rest will go for firewood.


From what I've read about stump preparation, the general idea is to try to keep the stumps from drying out too quickly because that can lead to cracking.  

I got some latex paint to seal the ends of the stumps.  Any latex paint would work, so I found some clearance paint that someone must have decided they didn't want.   


Once the paint dried they went into giant, thick trash bags to keep any remaining moisture contained. I'll air them out every week to keep mold from forming and then seal them back up until I see very little moisture when I check. I don't look forward to opening the bags...I'm sure there will be bugs that come out of the bark and no matter what my self talk is about creepy crawly things I generally end up hopping around and squealing. Maybe I can talk Ben into helping me.


Thursday, July 17, 2014

Timeline of a custom order

I love custom orders and I hate them.  Sometimes they push me to try techniques I haven't or otherwise wouldn't and it's a great feeling to make something special for a loved one. I'm happy I did it when it's done. But between the initial conversation about the idea for an item and the end product, there are typically some dark places and frustrations. Here's how the process pretty much always goes for me:


The most recent order like this was for a set of pins; shotgun shells set in sterling.  I hadn't made pin backs before but I'd read some tutorials and thought that I got how to do them well enough to give it a try.

I started with the shotgun shells, removing the plastic sleeve by melting it out.


I made the bezels and the pin pieces.  When I say it like that it seems like there were no problems, but there were.  Over and over again I melted pieces and didn't get good connections...it was sort of a nightmare.  I had to put them aside for a while and pull myself together.  


I finally finished three of them and then choked again on the fourth.  I stepped back and tried it a few days later.  That seemed to help - after what seemed like an eternity, they are done and shipped and I can start thinking about the next project.


Sunday, June 29, 2014

Catching up

Since summer started (and I don't mean officially...I mean once school got out in May) I've had less time to devote to the jewelry bench.  Baseball practices and games and trips to the pool seem to have taken center stage.  These are good things; we are having a great summer, but I'm starting to feel a pull back to that little space even if I don't really know what I'll make.

I have actually been making some simple "everyday" jewelry but those things usually end up in my Instagram feed rather than being posted here.  I like the idea of being able to take a picture with my phone (already connected to me because I'm generally listening to podcasts or music) mid-process or when I've just finished to post without loading the image to the computer, etc.  I also love the fact that there are people I make special projects for who aren't on Instagram; it's SO FUN to post pictures of those things in process...I know they won't see them so I don't have to wait until the jewelry is done and delivered to "talk" about the work. (I know. I lead a life on the edge.)

So in the spirit of catching up, here are some of the things I've been working on over the past couple of months:

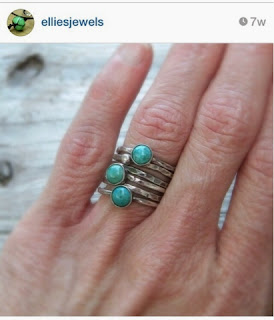
A stack or rustic sterling and turquoise rings.  On Instagram (@elliesjewels) and listed in my Etsy shop:


Earrings I made for a birthday gift (one of those projects I got to post ahead of delivery):


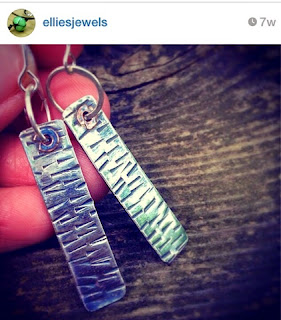
A set of everyday sterling earrings.  On Instagram (@elliesjewels) and listed in my Etsy shop:


An updated ring with a handcrafted glass cabochon.  Isn't that polishing compound pretty? On Instagram (@elliesjewels) and listed in my Etsy shop:


Sterling knuckle rings.  On Instagram (@elliesjewels) and listed in my Etsy shop:


And some everyday sterling earrings.  On Instagram (@elliesjewels)....soon to be listed in my Etsy shop:


Thursday, May 1, 2014

Turquoise engagement ring

My sister's boyfriend called me a couple of weeks ago and asked if I would make an engagement ring for her, similar to what I did last summer for my brother and his girlfriend. Of course I wasn't going to turn that down...the opportunity to be a part of something so special and be in on a secret that none of the rest of my siblings knew?  That's how you can get me roped in every time.


He wanted to go with turquoise because it's a favorite stone of hers.  We talked a little bit about the ring design in general terms but he left the specifics up to me. I decided to make two rings in fairly different styles for him to pick from and ordered a couple of different turquoise pieces to get started.  I got a couple of cabochons and also ordered a piece of Number 8 Mine turquoise from an Etsy seller. 

Maybe I'm a sucker for the history behind it, but the Number 8 turquoise quickly became the front runner; it was more unique and the color was gorgeous. I stuck with the plan and made two rings but by the time they were done I knew that was "it".

He picked the right one (IMO) and proposed last weekend.  She said yes and seems to like the ring (phew!). So the others I made at the same time are going to my Etsy shop as I can get the listings put together.

Congratulations, Sara and Mike!


Sunday, April 27, 2014

Pancake stack cake

Yesterday was the school carnival. Ben likes to take an entry to donate to the cake walk, which means we have to decide on a design that he can largely make on his own.  I bake the cake and frost it but then become his assistant.

In the past we've made a giant cheeseburger and fries, nachos, and a pizza. This year's cake was a stack of pancakes...really, really simple design but ohmygod it took forever to make.  


We started with something I've never tried before: a plastic ballon straw placed in the center of the cake plate for a center support.  More about that later.  

I put two six inch cakes over the center support and Ben started adding the "pancakes". These were just strips of white fondant that he rolled into snake shapes, then flattened and painted with food coloring.  


We added those fondant strips one at a time around the cake, building up the stack a little bit at a time.  


After adding about a dozen of the strips I started to wish we had made the cake much, much shorter. Getting to the top took almost an hour.


The final pancake is just one large circle of fondant added to the top.


Back to the center support.  We put several floral wires into the plastic straw for support and covered it with melted caramel (insert more food coloring here). Then we bent the support at an angle and put an empty syrup bottle on it.  I did end up helping a lot with this part because we had to cut the wires and bend the support a couple of times to get the angle right.

The final touches were colored piping gel "syrup" and starburst "butter". 

It doesn't matter how early we start the cake for the carnival or how much we plan for it; we are always running at the end.  So the only picture I got of the finished cake was taken in the school gym.

Ben was ecstatic about how the cake turned out and was SO PROUD to show his friends. Between that and the fact that I got to spend all that time hanging out with him, I'm feeing pretty fortunate.