I spent many hours over Memorial Day weekend at the jewelry bench. I took my coffee out to the garage in the morning on both Saturday and Sunday and worked until Ben woke up several hours later. I haven't felt that absorbed in the jewelry for a long time and was nice to fall back into it.
I am part of an online jewelry community that provides me great resources and inspiration for the work I do with metal and glass. The forum is full of talented artists who are willing to share their knowledge and support others. On the site, there is a section where members can opt to have their individual blogs feed in as the posts are published. Recently on the forum, I read a blog post by Melissa Muir giving a tutorial on using bezel punches to set faceted stones in sterling tubes. I couldn't help myself...immediately after reading the post, I went to the Contenti and Rio sites and ordered a set of bezel punches, some heavy walled sterling tubing, and a variety of faceted stones--semi-precious stones with a few cubic zirconia thrown in for good measure.
I have never really been drawn to the faceted stones. I don't know why, but I generally prefer larger, bulky stones in irregular shapes and the faceted stones seemed very dainty to me. After making the amethyst pendant for my sister, I realized I had been very wrong about the faceted stones...I would take that amethyst out and just stare at it sometimes because of the way it caught the light.
So Melissa's tutorial led me to try the tube settings in these pendants. I polished them first, but decided to go with a matte finish on them. I learned a lot by making several at once, and some are better than others, but I'm generally happy with all of them.
I can't get over the colors of the stones in this picture--I took it outside and the natural light really makes a difference.
...and the final product of the one that needed a chain:
Thanks, Melissa!
A creativity diary: rustic handcrafted jewelry projects and over the top decorative desserts for special occasions
Monday, May 31, 2010
Disaster ring and wire project
About a year ago, I started making a ring. I set it aside several times, picking it up here and there to do a little bit of sanding or soldering when I was at the jewelry bench doing other things. The bezel gave me a ton of trouble, though, so I had to redo it more than a couple of times. It would solder everywhere but one point, or would be a little uneven. Then I would sand it to try to get it level and weaken the bezel and decide to just start over. I don't know what it was, but there was something about that ring that just wouldn't come together. This happens from time to time, and when it does, I try to just set the troublemaker aside to try my luck on another day.
The sterling ring shank was super wide, and the large bezel setting waited for a hematite cabachon. A couple of weeks ago, I finished the setting. I thought. But I went to do one final sanding on the bezel and managed to create a small weak spot at the base. As I faced the thought of doing that bezel setting yet once more, I decided it was probably time to put the ring aside--again--for a while so I didn't get frustrated with it. But first, I would heat the whole thing up and take off the defective bezel so I would have a fresh start the next time I picked it up.
Instead, I overheated it.
Under my torch flame, the surface of the shank started to bubble and shrink back in what I have come to know meant the total death of the piece--the point of no return. I didn't turn off the torch and move away. I turned UP the torch and fried that entire thing into a shimmering puddle, gritting my teeth and probably muttering obscenities.
It wasn't until later that day that I realized I was relieved that the ring had melted into worthlessness. Finally, free of that stupid thing. I won't go out to the bench to work on something and see it lying there, mocking my inability to finish it. I don't have to try to figure it out. Ever. Again.
So all I have to offer is a sort of before and after of the ring; the materials I started with:
and the final product.
I guess it's a good thing I know I can at least use this mess by broom casting with it at some point.
I turned my attention to a project from Wire Jewelry magazine.
(Side note: I just started getting this publication and have been pretty pleasantly surprised by the abundance of ideas and projects it has. I don't do any wire wrapping, but I do use a lot of wire to make my findings and some of the simpler pieces I do. I get a few jewelry and glass work magazines and feel like they are half advertising...Wire Jewelry seems to go lighter on the ads.)
I made this bracelet, and I like the concept of it, but it's not so great on the functionality front. It is really hard to get on and off, and doing so can distort the wires going underneath the wrist. The project called for 14 gauge wire and I used 12, but still feel like it's a bit flimsy. I have thought about a way to make a clasp to attach the circle to the other side, but everything I have tried looks very out of place. In the end, I'm not sure what to do with it. I am going to have to put it aside for now and revisit it later...hopefully the result will be better than the ring I kept putting aside!
Wednesday, May 19, 2010
Cricut Cake: the trial run
Last night, Ben helped me try out the Cricut Cake. It was easy to set up--basically plug and play--and we had great success with our first attempt.
Between the time I knew I was getting the CC and the time it arrived, I watched some YouTube videos to pick up some tips and tricks for use. A couple of things that were universally recommended were to roll out the material directly on the cutting mat and to let it rest for about 15 minutes before cutting. (Some people even put the mat with the fondant or gumpaste attached into the freezer for a few minutes. I didn't do that, but would have if the fondant didn't firm up.)
I used Wilton fondant, primarily because it is fairly dry compared to marshmallow fondant. I think if I use MMF, I will add some tylose powder to keep it from sticking during cutting.
Since these were test pieces, I didn't add color to the fondant before cutting. I used the Wilton color mist spray and edible ink markers on them after the fact...a rush job, so pardon the coloring issues!
These were our first shot at it:
So far, so good! More to come...
Monday, May 17, 2010
A new cake tool
I get really excited about new materials and tools for the jewelry and cakes I make. There are tons of tools available for both, so I'm pretty confident that I will never run out of possibilities when it comes to spending money to support my habits.
Today, I hit the mother lode of cake tools. Lowell got me a Cricut Cake machine, and it was waiting for me when I got home from work. It's like a scrapbooking printer/template cutting machine...FOR CAKE. Instead of paper, it cuts fondant and gumpaste and frosting sheets. Crazy, I know.
Ben made plans for us to go running together and then make cupcakes this evening, so it is still sitting in the box. But I know exactly what it looks like, all shiny and red in its food safe glory:
In the caking community, there is great debate about the CC. Some people write posts about how it is the "worst thing ever to happen to cake" and it is ruining the caking profession.
I think the worst thing that can happen to cake is to drop it on the floor, frosting side down. Call me a sellout, but I know that thing is going to be FUN!
Sunday, May 9, 2010
Odds and Ends
I spent a lot of time wrapping up projects over the past week, so I'm warning you now that this post is a bit scattered.
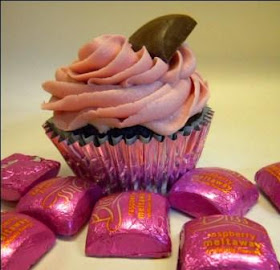
A while ago, I saw these "Bliss" raspberry meltaways and thought they would be the perfect embellishment on a cupcake. They were staring me down from the cabinet, so I made chocolate cupcakes with raspberry buttercream frosting and took them to work.
I made several more gumpaste shoes for the bakery last week as well, and this was my favorite of the bunch:
I also put together this teeny tiny pair of oxidized sterling fold formed earrings.
I spent a fair amount of time at the workbench this weekend, wrestling with a bezel setting, doing some wire work, and experimenting more with broom casting. Everything is in the tumbler now, so hopefully I will have some new jewelry pictures to post later on in the week!
Monday, May 3, 2010
Broom straw casting
About a year and a half ago, my little (taller) brother got me the book
Practical Casting by Tim McCreight. In the book, there is a short but clear description of how to use sterling silver scrap for broom straw casting to make organic looking pieces. I put it on my mental to-do list of jewelry projects because it looked fun, the set up seemed relatively low-cost, and I could finally recycle some of the scrap pile accumulating at my work bench.
To start, I needed straw. I found an old broom in the garage and decided to cut it up to use (let's not tell Lowell about that). Once cut, I bundled the straw together with a rubber band, soaked it in water for a couple of hours, and stood it up in an aluminum can.
I also needed a crucible. There are ways, apparently, to make a crucible, but I wasn't too interested in trying that. A couple of months ago, my siblings got me a gift certificate to Rio Grande and I used part of that to get the crucible. I filled it with my scrap pieces (ok, I didn't really use this much silver at one time, but this was the batch I planned to get through in one session of casting):
Side note: As I went back through my scrap to fill the crucible with an appropriate amount to heat, I realized that there was still quite a bit of useable silver in that pile. Sometimes I forget that, and I need to get better about going through the stash and using those pieces for pendant bails and embellishments. So I picked out the bigger pieces before moving on.
I moved the rubber band to the bottom of the straw bundle and spread the straw out to allow for some bigger casting pieces.
I heated the scrap in the crucible with my air acetylene torch until it was molten, then poured it slowly over the straw. Once I felt like I was done with that session, I poured some water over the (slightly smoking) straw, then took off the rubber band. I spread the straw out on some newspaper and sifted through it to get my newly formed pieces:
These are straight out of the casting process, so I still need to sand and clean them to use them in jewelry, but I'm not totally sure what I want to do with them quite yet.
This one, I think, looks like a demon riding a motorcycle, hair-flames blowing back in the wind:
All he needs is a couple of sparkly, faceted stones in his eye sockets.
Sunday, May 2, 2010
A couple of cats
I was going to make Sara a cake for her birthday. A giant, donut-shaped cake covered in marshmallow fondant like one I made about a year ago:
But she requested a cake without white flour, and I had no trusted recipes for one that wouldn't taste like cardboard. So I didn't end up making the actual cake, but offered to decorate it instead.
When I was trying to figure out what to make for the topper, there were a few ideas swirling around...sewing, cooking, etc...but Gage teases her a little bit about becoming a cat lady at the ripe old age of 20-something, so I decided to make her cats in sugar for the topper. I spent some time stalking her on Facebook to try to get some of the features right:
Then I made the cream cheese frosting and put together a little (read: enormous, full of everything I thought I might possibly need...once, about 15 years ago, I went to a picnic/cookout where the host forgot to bring a SPATULA for the hamburgers. I think of that every single time I pack up to do any food prep off-site and may overdo the packing...slightly) decorating kit. The boys and I went to Sara's little get-together and we finished the cake there:
We had some leftover frosting, so I put out a plate of pretzels with a cream cheese frosting wheel. If you have never tried this pretzel and frosting combo, do not start. It's extremely dangerous. I hadn't even thought of doing this (strange, since I think frosting is a stand-alone meal and will try it with just about anything!) until I took a cake decorating class and they introduced me to the notion. It's utter bliss.
Happy Birthday, Sara!